Monday 29 July 2013

Illamasqua Hydra Veil Review

Hello Dolls,
This is a review I am REALLY excited to do, it is on my new beauty staple; Illamasqua Hydra Veil. Illamasqua describes it as follows:

"Create a radiant finish with Hydra Veil's instantly re-hydrating gel formula. It provides the optimal base for your makeup. Apply before foundation with an Illamasqua brush."

There has been some confusion among beauty bloggers as to what to call this product, some say it is a gel moisturizer, some say a very hydrating primer and some say it's both. Although Illamasqua say it isn't a primer, I have to say it makes a pretty damn good one. It almost glues foundation to the skin. The Rich Liquid foundation (review coming soon) which many people say is too thick/cakey glides on like MAC's Face & Body.

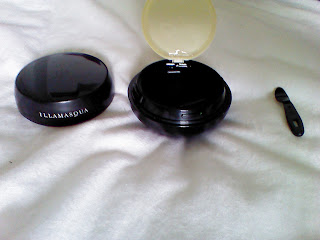
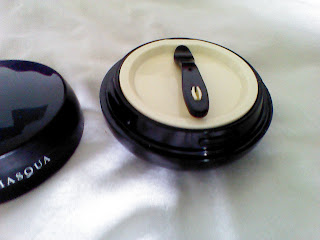
It costs £27 pounds from Illamasqua's website (link HERE) and you get 30ml of product. It comes boxed in Illamasquas staple glossy black box. When you open the box you are greeted by a gorgeously shaped black jar with a twist off lid. There is a second seal inside which lifts off which is a great idea as without it I think this product would dry out quickly. You also get a black measuring spoon so you get just the right amount of product.


It has a scent to it so be warned if you have very sensitive skin, the fragrance is very fresh and pleasant but I have no idea how to describe it. You need a very small amount to cover your entire face and neck so while 30ml isn't the biggest size it should last awhile.

What I adore about this product is that it has a sticky finish so it literally sticks foundation to the skin and blemishes, I can imagine that would be brilliant with powder foundation (maybe MACs Studio Fix Powder?). I have combination, blemish prone skin and this hydrates it and ensures any spots are totally covered with foundation.

I am totally smitten with this product. I knew I had to have it the second Illamasqua announced it. It is even better than I anticipated and after two months of using it I had to review it. I would defiantly re-purchase it the second I run out and I can't recommend it enough. My only warning is, it is scented, so sensitive skinned ones beware.


Until next time Dolls, xoxo. 

Manic Panic Vampire Red (AMPLIFIED) Review/Tutorial.

Hey Dolls,
Today I am reviewing an amazing product by the brilliant Manic Panic N.Y.C. I am a total 'dyehard' and I adore Manic Panics outrageously pigmented formulas. Before I get down to the serious review I must mention just how pigmented this dye is, my natural hair is nearly black and I only slightly lighten it and the dye TRANSFORMS my hair. If it can turn dark hair vivid red it must do incredible things to fully bleached hair.

I paid £12.99 for my bottle of Vampire Red which I bought from a shop called Blue Banana (Seriously it's an actual shop! :O ) and for that you get 118ml of dye. It comes in a cool bottle with a press down lid with the holographic word AMPLIFIED taking center stage. I like the fact it's in a clear bottle so you can see how much dye you have left.

Manic Panic dyes are totally vegan and are not tested on animals, big bonus! There is NO hair destroying ammonia or nasty chemicals. I can't describe how soft it leaves my hair feeling. It says to leave the dye in for 15-30 minuets but I leave it in for 3 hours to fully develop in my dark hair. I know people that SLEEP with the dye in and wash it out in the morning.

It also lasts a crazily long time, usually semi-permanent dyes last about a week in my dark hair, this was still visible after two and a half!! And even better it didn't bleed, stain the bath or have any other annoying issues! I've heard people with bleached hair say it lasted longer than most permanent red hair dyes they have tried. Now that is impressive. This was my first Manic Panic dye but after this I am 100% buying some different colours to review for you all. This is defiantly my favorite brand. I love the attention to detail, the colour range, the packaging, the list of celebrities that swear by it is amazing too! Katy Perry, Kerli, Rihanna, etc.

After a week of every day washing. STILL Vibrant!!! (WHOA)

It's only hair dye.

*Tips & Tricks to make semi permanent dyes LAST*
1: Use warm water to wash your hair before applying the dye and use a PH balanced shampoo. Then use the coldest water you can stand to rinse the dye out.

2: Go as long as you can without washing your hair. Don't sacrifice hygiene for bright hair but obviously if you wash your hair every day the dye won't last long.

3: Wear a shower cap when the dye is in your hair. You will look frankly ridiculous but the shower cap traps heat, opening the hair follicle and letting the hair soak up even more colour.

4: Mix a little dye in with your conditioner and let it soak in. This is a great way of keeping your colour vibrant AND keeping your hair in great condition. 

5: Don't blow dry your hair. Not only does it fade your hair dye, it also drys out your hair and scalp!

As a little side note if anyone has any picture of themselves with this dye on bleached hair can they send them in if they don't mind me posting them? I'd LOVE to show my readers how this amazing product looks on bleached hair. 

Until next time, xoxo


Saturday 27 July 2013

Illamasqua Art Of Darkness Palette Review

Hey Dolls. Today I'm reviewing Illamasqua's Art Of Darkness Liquid Metal Pallette. (Photos and swatches below.) I picked this up in Illamasquas sale last year and have only just thought to review it. It retails for around £35 and you get four GORGEOUS cream pigments. Stoic, (green),Solstice, (gold) Resolute, (rust red) and Superior (Dark blue). In the pan these shades are all gorgeous molten metals and the payoff is insane. One swipe gives full colour. It is unbelievable.

However the liquid metals are a bit infamous for the wrong reasons. Sadly you can't keep them on your lid. They crease, they slide, they fade. It is so heart breaking. Although if you apply them on primed lids and then dust them with a translucent setting powder you can keep them in place.

As always with Illamasqua, the packaging is gorgeous. It is in their standard sculpted, glossy black plastic case. It oozes luxury. It is also sturdy as hell too. God knows how many times I've dropped it (whoops). Yet there is not a scratch on it.

You can also use these gorgeous pigments on the face and body, you could do AMAZING things with this palette if creative or bizarre makeup is your thing. Ivy green contour with gold highlights? *drools*. As with all Illamasqua makeup, it was created to be played with. There are no rules.

You do need to play with the liquid metals to make them work, but they're worth it. They are so beautiful.

Packaging: 10/10. Very sturdy and nice looking.
Price: it's Illamasqua, not Rimmel, you have to expect the price. But it's worth it.
Ease of use: 6/10. You do have to experiment to get the best from this palette but it's worth it.
Would I buy it again? YES!

Until next time Dolls. Xoxo

Friday 26 July 2013

M.A.C Fix+ Review

Hey Dolls,
So this is a very quick review on MACs Fix+. There seems a lot of confusion over what this product actually is, as the name Fix+ insinuates that it is in some way a setting spray.....which I'm not sure it really is. It certainly hasn't prolonged the wear of my makeup, but it certainly has some other very good uses.

This product is £13 from MAC and you get 100mls of.....water. But it isn't just water, it is infused with cucumber, minerals, caffeine, ginger and all sorts of other 'good for skin' things. Does that equal £13 worth? I hear you ask....well yes and no. As I say it is NOT a fixing spray but it has a lot of uses.

You can spray it on your face before your makeup to hydrate and freshen your skin. You can spritz it on an eye shadow brush and use it as a mixing medium. You can use it to freshen your face during the day AND my personal favourite, spray it on your face AFTER your setting powder. You may ask why as it's not a finishing spray but what it does very well is remove the powdery finish from makeup and gives your skin a gorgeous dewy glow. It looks (and feels) AMAZING.

Would I buy it again when I run out?
I'm not sure, but there is a very high chance I would. It is amazing.
Until next time dolls. Xoxo.

How to care for spot prone skin.

Hey Dolls, sorry I haven't posted in awhile I have been busy working on a college assignment (on DERMATITIS!! >.> ) Anyway, as I am a teenager and a makeup student I am aware most of us suffer with spots, breakouts and pimples (technically three words for the same thing but shh it's MUA jargon). But I have learnt several ways to keep my blemish prone skin largely under control. Let me tell you, these tips have made a world of difference to me. So hopefully they can help you too.

1: Diet.
As I know this one won't make me very popular, I figured I may as well get this out of the way. Diet is hugely important to your skin. It can dry it out. it can make it appear ashen or it can make it very oily. So if you wish to cut down on very oily, spot prone skin, the first and most beneficial step can be making changes to your diet. Lots of fresh foods, cutting out fatty snacks and oily fried food and getting more exercise can dramatically improve your skin.

Other damaging dietary no nos are excessive alcohol consumption,  too much coffee or tea and too much sugar. However don't deprive yourself of something you love, I know I could NEVER eradicate coffee from my life.
Things like drinking a lot of water, eating fresh fruit and leading a healthy lifestyle are great for your skin. They really make a huge difference.

2: The right Cleansers.
I have tried a tonne of cleansers to mixed results and can finally say I have found my holy grail of cleansers. I use two different cleansers, one at night to remove makeup and grime from my face before I sleep and another night and morning that is designed to treat blemishes and remove excess oils from the skin.

The first cleanser I swear by is by Nivea, this is the one I use to remove makeup in the evening, it is their Refreshing Face Wash. I got this in Superdrug for about £3 and I can't believe how long it is lasting. It is amazing. It is very gentle on the skin and very effectively removes makeup. I swear by it.

My absolute MIRACLE product for spot prone skin is by Avene. It is their Soapless Cleanser For Oily And Blemish Prone Skin (rolls of the tongue, right?) This isn't cheap, it costs around £10.50 depending on where you purchase it,(UK readers you can buy it from Boots, link here) but it is worth every penny. You need such a small amount. I have been using the same bottle for about nine months and am no where near finishing it. It is a insanely good product for combating blemishes. I can't recommend it enough. You do need to moisturize after using it though, and this brings me very nicely onto my next tip.

3: MOISTURIZE!:
I know a lot of people who think because they have oily skin they shouldn't moisturize. This is NOT the case! A good oil free moisturizer is vital. I personally love Clean & Clears Oil Free Moisturizer. It is very light, sent free and also has the bonus of helping get rid of spots. Win/Win.

4: NEVER, EVER SLEEP IN MAKEUP!:
Ladies (and boys, I'm not judging) NEVER sleep in your makeup! Your skin needs to breathe. Before you go to bed remove all makeup and apply a good moisturizer. Otherwise you will very quickly get clogged pores and the mother of all breakouts.

5: Sleep:
Sleep is vital, not just for your health, but for you skin as well. Bags under the eyes isn't the only sign you don't get enough kip. It can cause breakouts, redness and tired and dull looking skin. So make sure you get plenty of rest.

Sponsors

Sponsors

Sponsors

Privacy PolicyAboutFAQ

Designed By Girl in the city Designs.